How to Phish Using a Jump Box Part 2
GoDaddy GUI Stuff 🙈
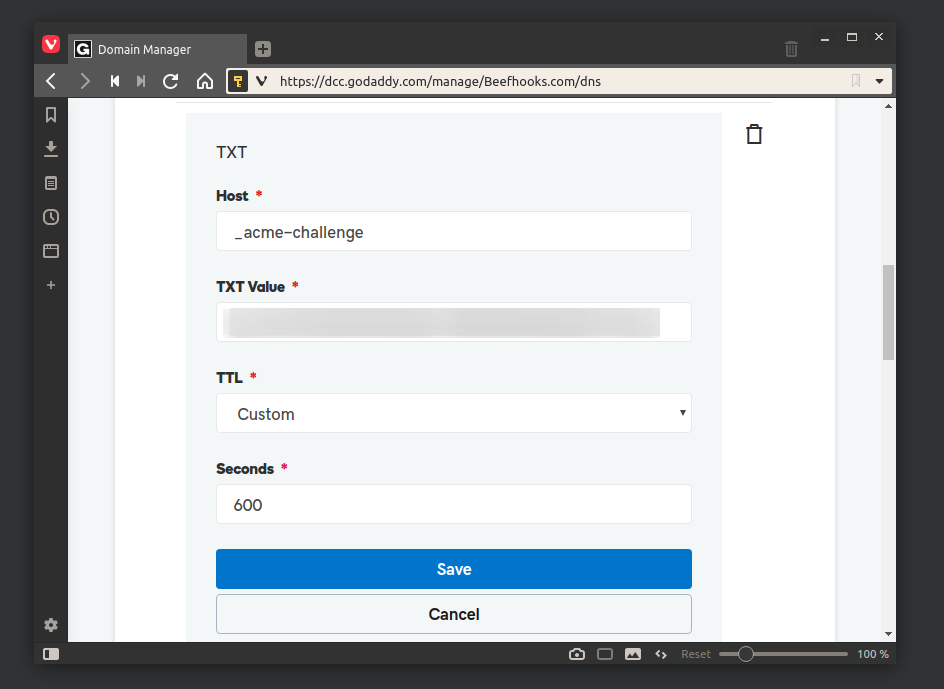
So in my first post I didn't show how I had all the DNS things set up in GoDaddy. One thing I always get hung up on is adding the TXT record for Let's encrypt. I always find a way to mess up the TXT record somehow. This is how it should look when you're waiting for the DNS registrar to update your Let's Encrypt TXT record:
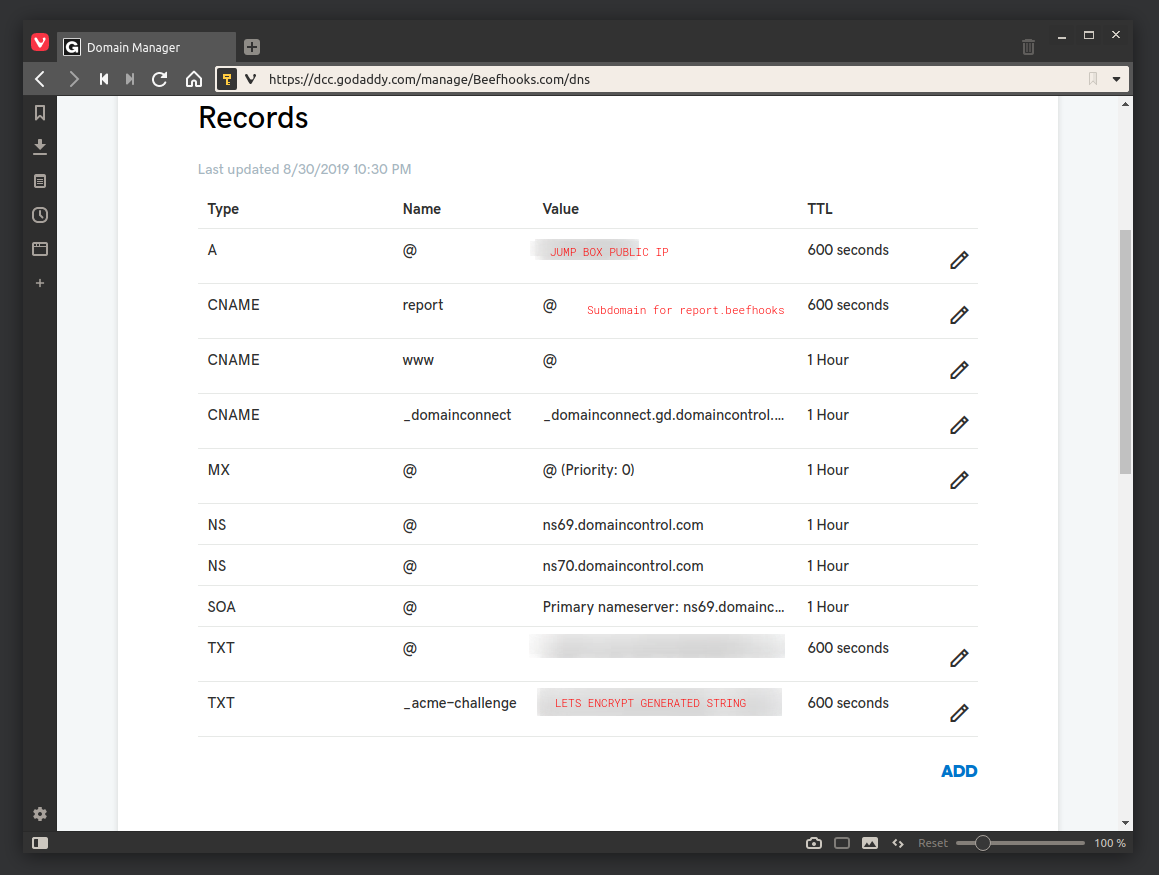
As for the other settings, this is what my Beefhooks.com site DNS settings look like:
Setting Up Gophish GUI Stuff 🔧
We already touched base on how to set up the config.json file for Gophish but we haven't looked at setting up the Landing pages and all that; Lets go over that now. So after you get the Gophish service running on port 3333 and you get authenticated and all that, you'll want to start setting up the components of the phish which are:
-
The Landing Page: The page that’s going to be presented to users when they click your phishing link
-
The Email Template: Email sent to your email targets
-
Users & Groups: Email targets that will receive the phishing Email
-
Sending Profiles: User that is going to be sending out the phishing email
Landing Page ✈
Starting with the most interesting one first, the landing page; This is where you'll need to import the page you'd like to clone and use to fool your targeted users. To do this Gophish has a really good import function that works real well most of the time. It'll get hung up if there's a bunch of Javascripty stuff on the login forms sometimes so you'll have to be creative in those instances. There's also some Firefox/Chrome extensions that can be used for saving pages HTML source code that are capable of handling heavily JavaScripted login forms. For this example I just used GoPhish's function to import a page:
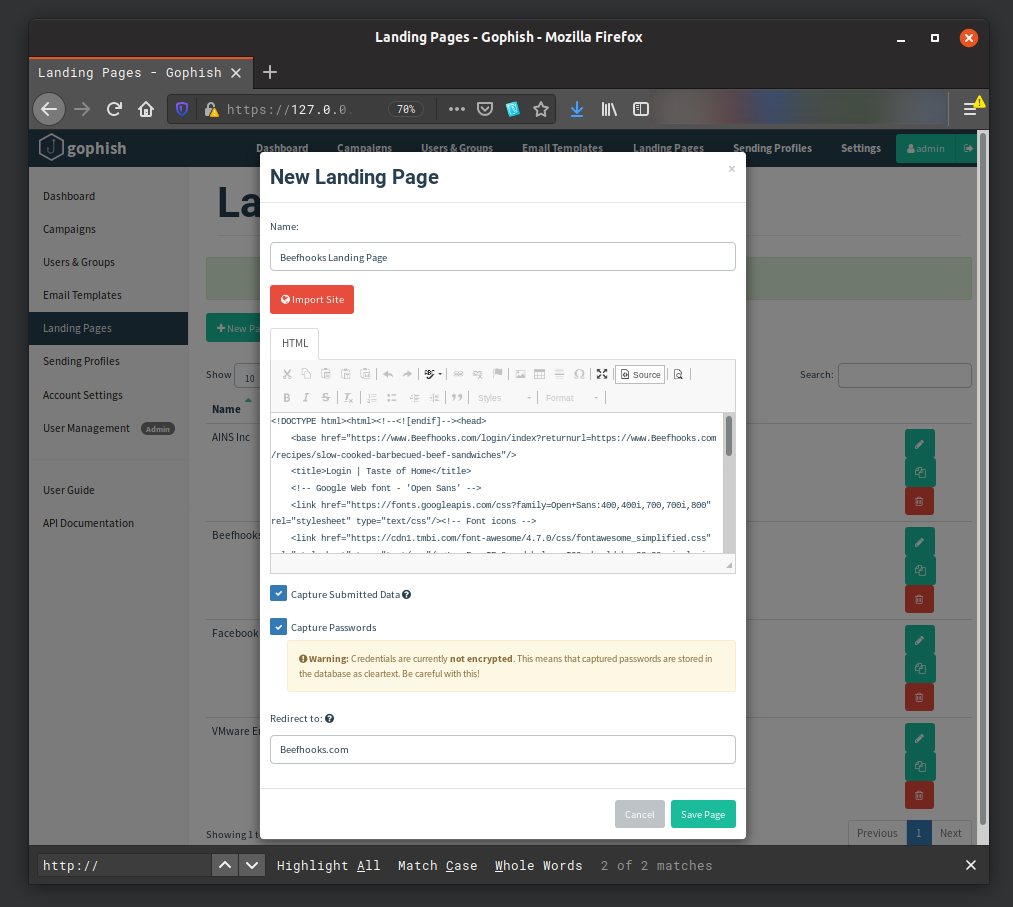
Yours should look something like this. Be sure to select capture credentials and capture passwordsso that submitted data will be captured for your viewing later on.
The Email Template 📜
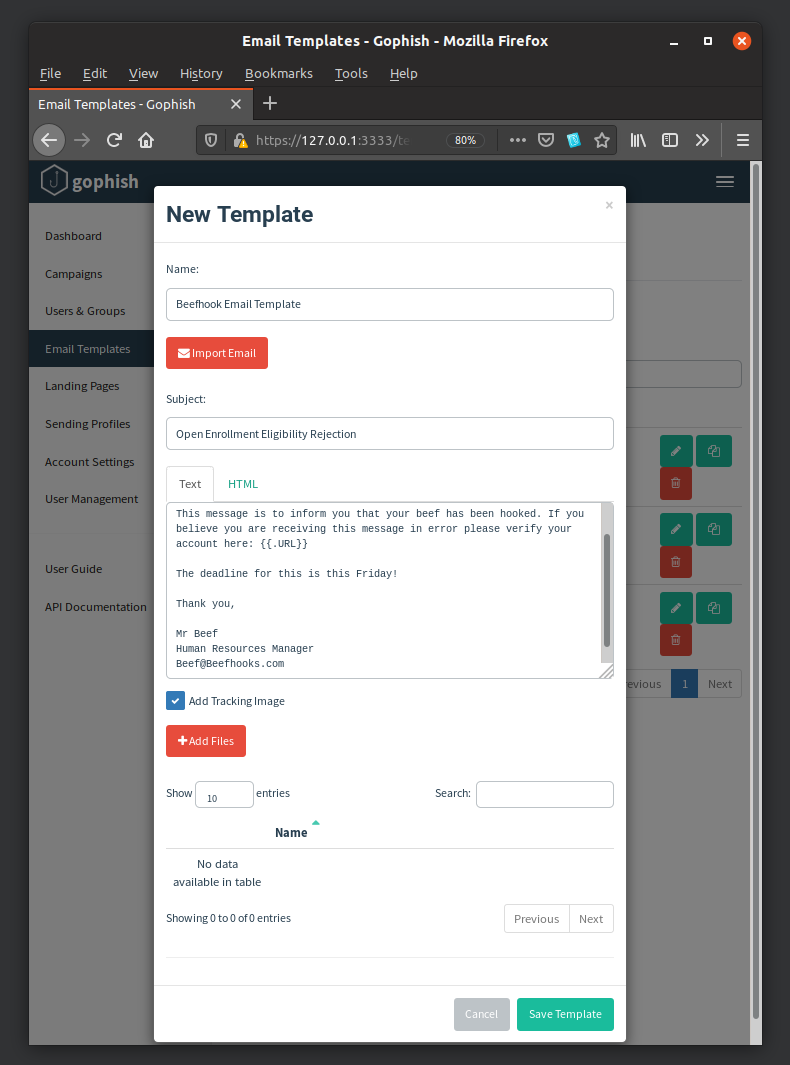
Once you've set up your landing page you'll want to set up your email template. This is where I've found that the documentation on Gophish starts lacking a bit as it can be difficult to find certain things. This is also where your creativity will come in as you'll have to think of a convincing LIE, you little disgusting liar (lol), that will get users to fall subject to your phish. Take a look at how I set my email template up to get a general idea:
Things to Note on the Email Template 📫
Gophish has functionality that will act as variables. They're pretty self explanatory but finding all of these in the Gophish documentation was tough for me. The URL variable is probably the only one that needs clarification out of the three; This will be the malicious URL that your phished users will click which will direct them to your malicious landing page.
Another thing you'll want to do is make an HTML version of your email. This will help increase your legitimacy when getting through the spam filters. Basically if you just copy your text version and hit the HTML tab at the top and then paste it there the HTML will automatically populate. You'll need to go back to the Text tab after you paste then look at the HTML tab again so it can do a little refresh and the HTML code will populate automatically nice and neat. It will also allow the {{variables}} I mentioned above.
Users and Groups 😜
Seriously...you don't need my help with this...Okay I'll give you this: If you have a ton of users GoPhish has a bulk import feature that will allow you to import from a spreadsheet. Make sure you download their CSV Template and fill it in with your users.
Spam Filters 💫
Now that you have everything situated you'll want to do a test Campaign before blasting this puppy out to your users. For this you can use Mail Tester or something similar to see how well your email does against spam filters. If something is off it will let you know here. A good number to shoot for is 7/10. Anything less than that will likely not reach your users. Thanks SweetRoll for teaching me this part!
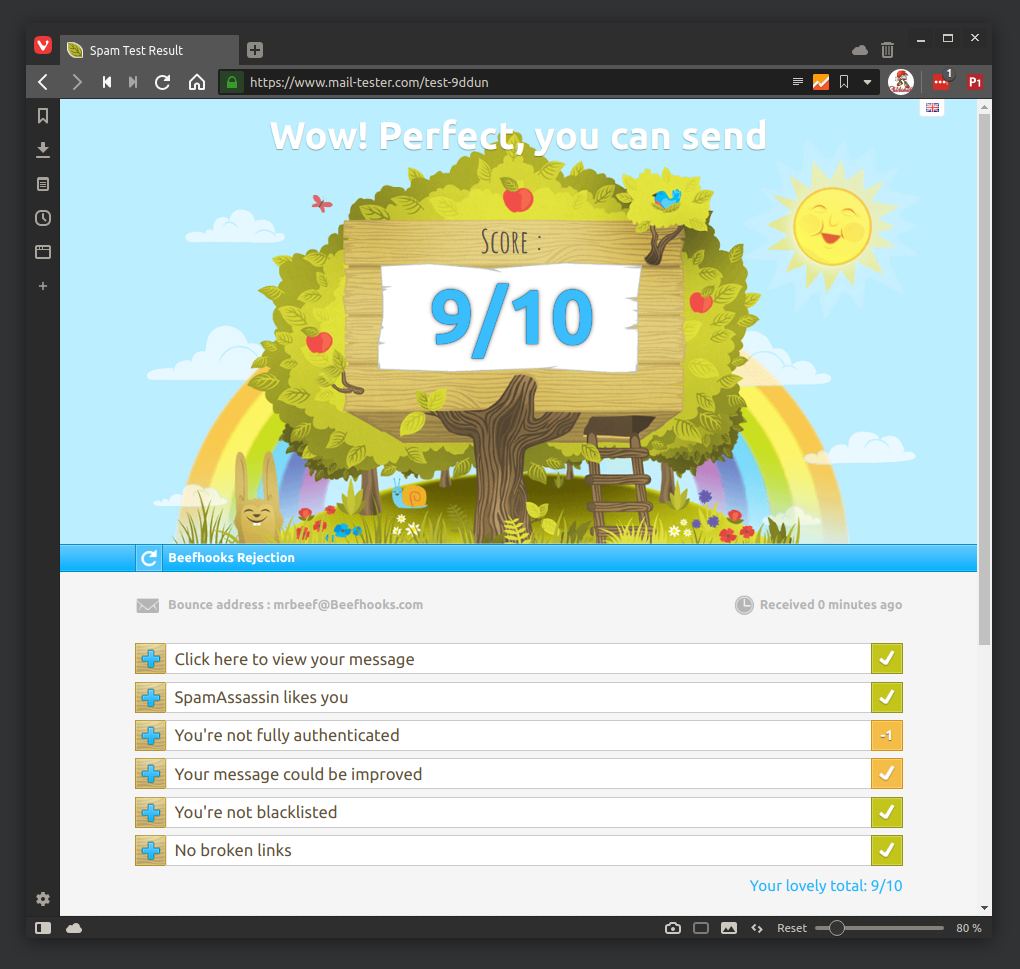
Once you've addressed any issues that came up while testing your phish and you are now satisfied with your score, it's time to launch the Campaign!
Campaign Settings 🔫
You can use settings similar to mine below to launch your Campaign:

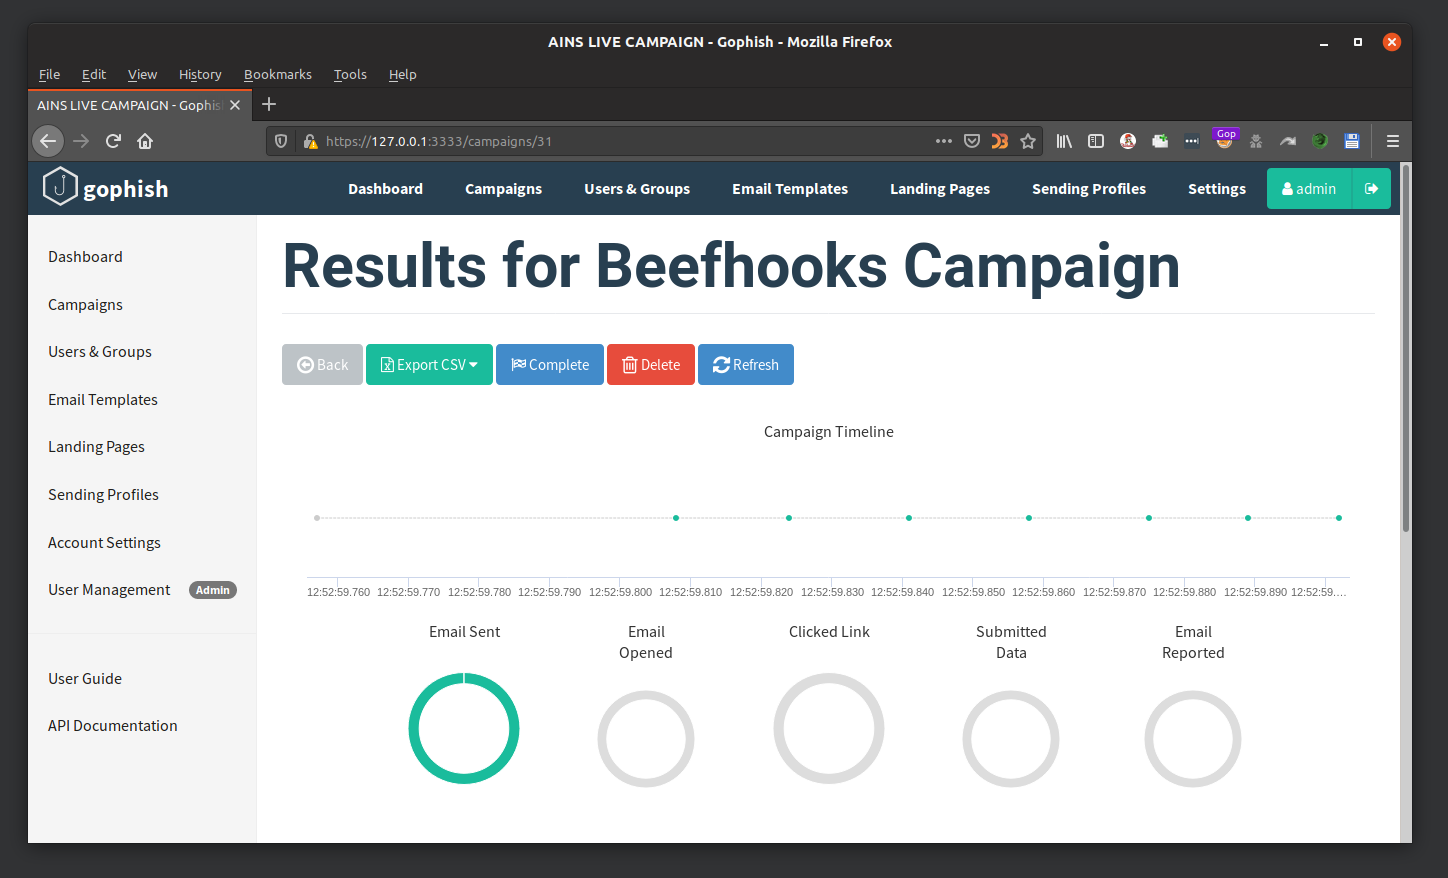
Keep in mind that the URL setting will be the domain name that you purchased from Godaddy or whichever domain registrar you used during the initial configuration steps, NOT your Jumpbox's IP, though it still may work! Once you launch your Campaign you can kick your feet up and wait as the clicks and creds start rolling in one by one. This will be the dashboard you see while your campaign is running:
Shout-outs 📢
Special shoutout to my dude SweetRoll for helping me learn some of this stuff. He's got something nice he's working on for phishing that's pretty sweet (pun intended). Also big shout-out to Jake...aka the cobra.. for showing me that phishing from my jump box was even possible. Thanks!
__________________
< y0u L1tt13 L14R! >
------------------
         \      (__)
          \     /oo|
           \   (_"_)*+++++++++*
                  //I#\\\\\\\\I\
                  I[I|I|||||I I `
                  I`I'///'' I I
                  I I       I I
                  ~ ~       ~ ~